“Ride your green bicycle” can be used to recall the colours of the limb electrodes going clockwise starting from the right-sided wrist (i.e. “ride” for the red lead which is placed on the right-sided wrist”).
Note: If the patient moves their right arm to their left shoulder, it will form a red, yellow, green traffic light.
Introduction
Introduce yourself with your name and role, and confirm the patient’s name and date of birth. Explain the procedure, check the patient’s understanding, offer a chaperone and obtain consent. Wash your hands.
Ask the patient if they have experienced any pain, especially chest pain, and offer analgesia as appropriate.
When explaining the procedure to the patient, it is good practice to inform the patient that an ECG will only monitor the normal electrical activity of their heart, and will not deliver any electrical shocks through their body or cause any pain. For example, you may say:
“This will involve me placing some sticky tags on your chest, arms and legs. These will be connected to a recording machine which monitors the normal electrical activity of your heart. There will be no electricity and you will not feel any pain.”
“This will involve me placing some sticky tags on your chest, arms and legs. These will be connected to a recording machine which monitors the normal electrical activity of your heart. There will be no electricity and you will not feel any pain.”
Positioning
Position the patient on the bed set at a 45° angle, and ensure that the patient is exposed in a manner that allows unrestricted access to the skin of the chest, arms and lower legs.
Electrode placement
Only 10 electrodes are used in a 12-lead ECG; four on the limbs and six on the chest. Check that the electrodes are in date and that the gel has not dried up. Ensure that there is good skin contact with the electrode.
Prior to placing any electrode, you may wish to gently clean the area of skin with a paper towel to remove any oil or dirt.
If necessary, with the patient’s consent, shave the local area.
In a real OSCE scenario, it is cumbersome for a student to place all of the electrodes on a model patient. Therefore, it is more likely that you will be asked to palpate the anatomical locations for each of the electrodes and show this to the examiner.
Limb electrodes
Attach the four limb electrodes at the following locations:
- Right wrist - Red electrode.
- Left wrist - Yellow electrode.
- Left ankle - Green electrode.
- Right ankle - Black electrode.
Chest electrodes
Attach the six chest electrodes at the following locations:
- V1: 4th intercostal space at the right sternal border.
- V2: 4th intercostal space at the left sternal border.
- V3: Halfway in between electrodes V2 & V4.
- V4: 5th intercostal space in the midclavicular line.
- V5: Anterior axillary line in the same horizontal plane as V4 & V6.
- V6: Midaxillary line in the same horizontal plane as V4 & V5.
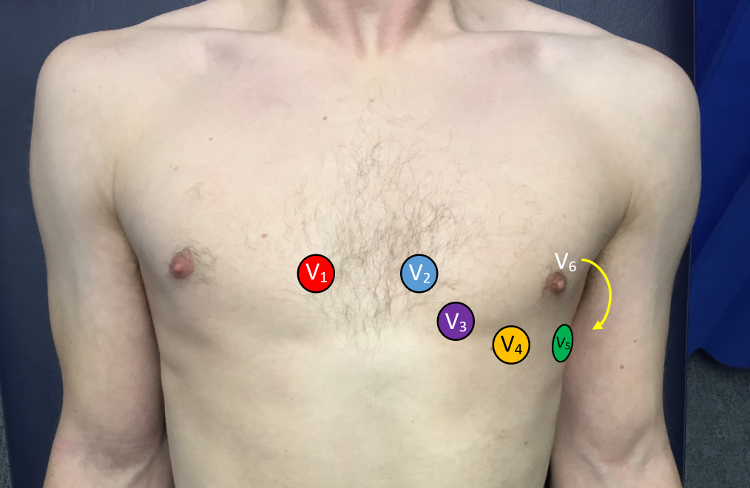
Palpate to position the chest electrodes correctly.
Note: Electrodes V4, V5 and V6 lie in the same horizontal plane as each other (V5 and V6 do not follow the rib around).
To prevent the electrodes from being pulled off during the recording, connect the wires to the electrodes in a manner that reduces tension on the wire. For example, all chest electrodes should be placed with the wires facing down.
Recording
Ensure the patient is relaxed, remains still and does not talk during the recording to reduce the effect of muscle artefact on the ECG trace. Inform the patient that they can continue to breathe normally. Start the recording.
Moving muscle will produce interfering signals that will make interpretation of the heart’s electrical activity much more difficult.
Completion
Once the recording is complete, with care, detach the leads from the electrodes and remove the electrodes. Thank the patient and ask whether they would like help getting dressed. Remember to wash hands again.
Once the ECG trace has been printed, immediately write the following details on the ECG:
- Patient’s name.
- Date of birth.
- Gender.
- Hospital number.
- Position (if different from 45°)
- Indication for the ECG (e.g. chest pain).
A patient sticker may be used to supplement this.
In a real OSCE scenario, you may be asked to do more than just take a recording. For example, a station may give the following instructions:
- 1. Explain the procedure to the patient in simple terms.
- 2. Identify the correct position of the leads on the patient to the examiner.
- 3. Label an ECG tracing the examiner gives to you.
- 4. Interpret the ECG trace.