The cannula size should be as small as possible to meet the clinical needs of the patient. Cannulas are sized by ‘gauge’ or ‘G’ – the larger the gauge the smaller the bore size and the slower the rate of flow. Green (18G), pink (20G) and blue (22G) cannulas are commonly used on the wards for fluid and medication infusions, and larger orange (14G) or grey (16G) cannulas will be used to gain intravenous access in surgical emergencies for rapid transfusion.
Introduction
Introduce yourself with your name and role, and confirm the patient’s name and date of birth. Explain the procedure, check the patient’s understanding and obtain consent. Wash your hands.
Ensure the patient is comfortable and check which arm they would prefer blood to be taken from. Ask the patient to expose their arm by rolling their sleeve up, if necessary.
Ask the patient if they have any allergies, specifically to latex. Also ask whether they are taking any medications, specifically anticoagulants, and if they have had any surgery recently that may affect the arm you take blood from. Check whether the patient is currently in any pain.
When describing cannulation to a patient, it is often useful to ask if the patient has had the procedure before to find out how much they know. Use simple phrases such as: “this will involve me placing a needle into your arm that will allow me to put a very thin plastic tube into your vein. Through this we can give you medication. You will feel a sharp scratch as I insert the needle but otherwise there won’t be any pain.”
Equipment
Collect a plastic tray, and clean both the inside and outside of the box thoroughly with an alcohol surface disinfectant wipe. You will then need to collect:
- A pair of non-sterile gloves.
- Tourniquet.
- Cannula (size as required).
- Cannula extension set.
- 10mL 0.9% sodium chloride (saline) solution for injection.
- 10mL syringe and blunt needle (≤18 gauge).
- Alcohol swab (2% chlorhexidine in 70% alcohol).
- Sterile gauze.
- Cannula dressing.
- Sterile field dressing.
- Protective field underlay.
- Sharps bin.
Check the expiry dates of the cannula, extension set, alcohol swab syringe and saline solution.
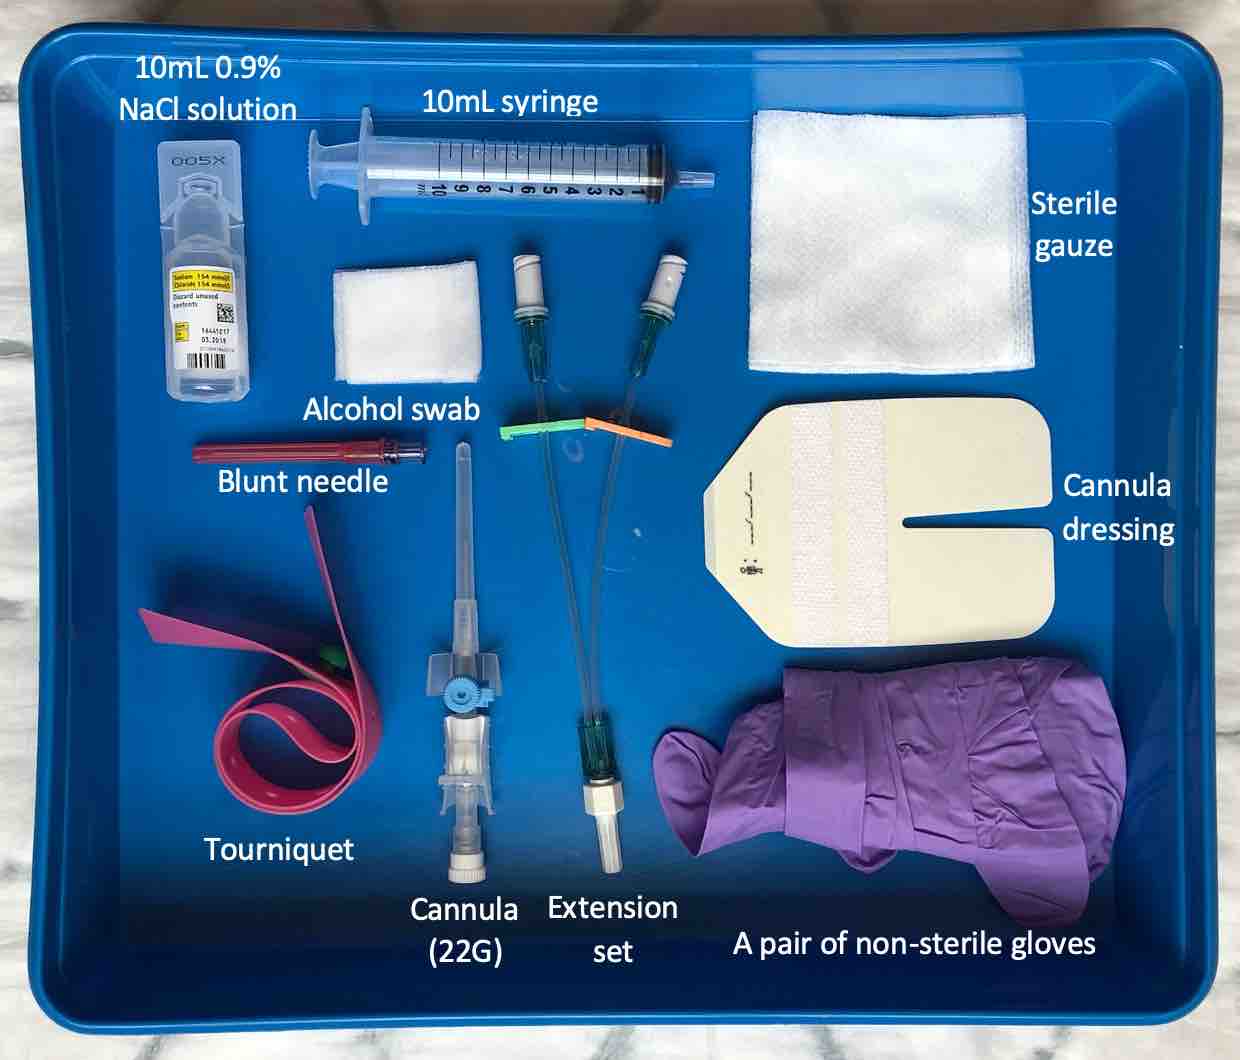
Equipment for cannulation using a blue (22G) cannula.
Equipment preparation
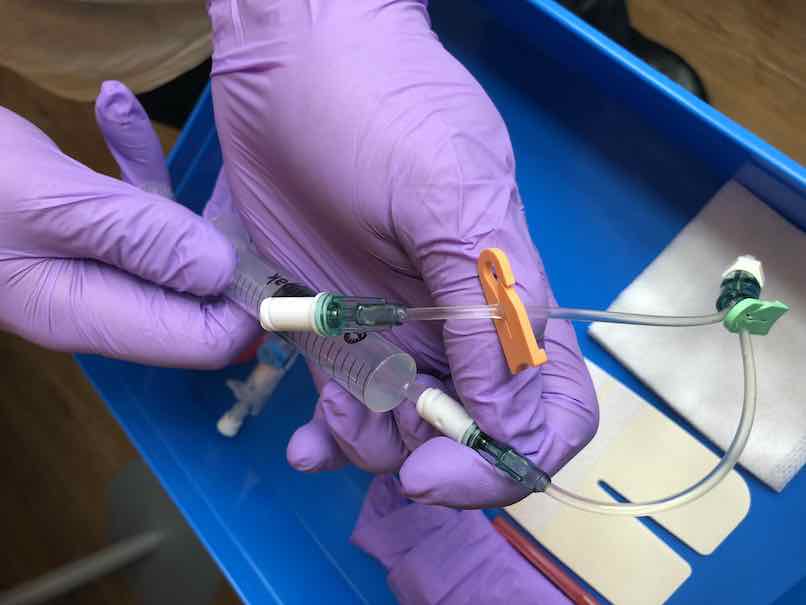
Apply a pair of non-sterile gloves. Spread the sterile field dressing out in a clean area near to the patient. Remove the cannula and dressing from their packages and place them into the field.
Use the blunt needle and syringe to draw up 10mL of saline solution to prime the extension set and flush the cannula. Remove the extension set from its packaging and carefully remove the white cap from the end. Prime the extension set by syringing roughly 0.5-1mL saline into each of the ports until it flows from the cannula attachment site. Place the syringe back into the tray for flushing later.

Some extension sets will require priming with saline solution.
Whilst this is not a sterile procedure, it is important to adhere to aseptic non-touch technique. The needle and any areas of connection should be kept sterile at all times.
When priming the extension set, it is useful to keep the end that attaches to the cannula within the extension set packaging to prevent saline spillage.
Vein selection
If possible, place a pillow beneath the patient’s outstretched arm for support and ensure the patient is comfortable. Place a protective field underlay beneath the patient’s arm to capture any blood spillage.
Visual inspection
Inspect the patient’s arms for any other cannulas, arteriovenous fistulae and areas of bruising, swelling, infection or broken skin. These areas are a contraindication to cannulation and should be avoided. Avoid taking blood from an arm that has been affected by surgery, looking for signs of oedema and scarring, or pre-existing medical conditions, such as a stroke affecting movement of an arm.
Replace your non-sterile gloves.
Palpation
Apply the tourniquet to the patient’s arm to visualise veins more easily, around 4 fingers width above the planned cannulation site. Palpate a suitable vein, which should feel soft and ‘bouncy’. Avoid veins that feel hard (may be due to phlebitis). Veins that are straight and avoid joints are ideal.
Be careful not to leave the tourniquet on for more than a minute. Release the tourniquet after vein selection and reapply it before needle insertion.
Typically veins in the dorsum of the hand or the posterior forearm are used for cannulation, although in an emergency any large peripheral vein may be used.
Site preparation
Release the tourniquet. Open and shake the alcohol swab, clean the cannulation site with circular motions moving from the centre outwards, and allow to dry completely for 30 seconds. It is essential that you do not re-palpate the area from this point onwards.
Cannula insertion
Re-apply the tourniquet and identify your vein.
Pick up the cannula, open out the wings and remove the needle cap. Anchor the vein in place by gently pulling on the skin distal to the vein with your non-dominant hand. Insert the cannula into the vein at an angle of 15-45° to the skin, with the bevel facing upwards. Just before inserting the needle, warn the patient that there will be a "sharp scratch".
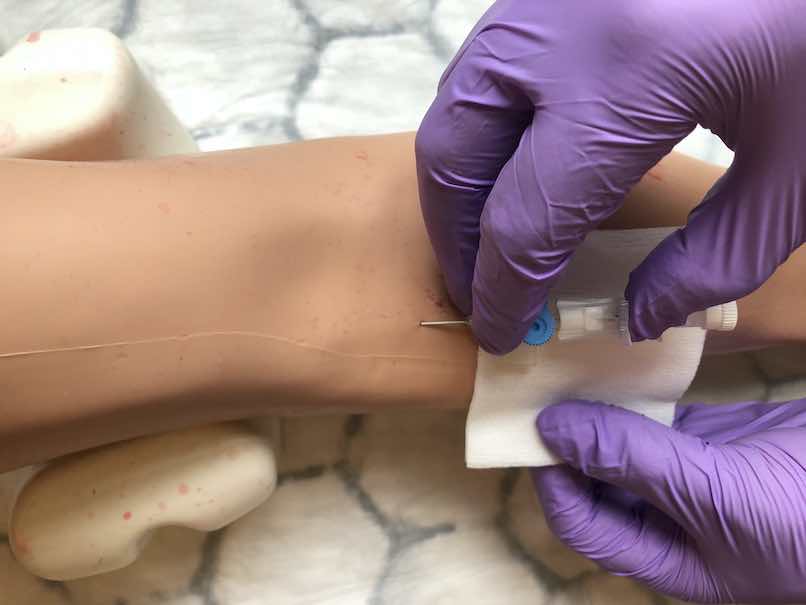
Insert at a 15-45° angle, using your non-dominant hand to keep the skin taught.
Observe for flashback in the flashback chamber to confirm that the needle has entered the vein. Lower the cannula, reducing the angle between the needle and the skin. Advance the cannula 1-2mm further to ensure the needle is inside the lumen and then withdraw the needle slightly, observing for a second flashback in the cannula shaft. Advance the cannula tubing whilst holding the needle in place, until all the tubing is inserted into the vein.
The art of cannulation has all to do with this last step. It is imperative that once you see flashback you keep the arm firmly secured and the skin taught. Doing so ensures that the vein does not move as you try to advance the tubing. We recommend that you use your dominant hand to simultaneously advance the tubing whilst retracting the needle, and your non-dominant hand to focus on keeping the arm still and the skin taught.
Needle withdrawal
Release the tourniquet and position some gauze beneath the extension set port. Apply pressure just proximal to the tip of the cannula, hold the cannula in place and withdraw the needle completely. Place the needle into the sharps bin.
Fixing the extension set
Quickly attach the primed extension set to the extension set port on the cannula, as blood will begin to flow once the needle is removed. Use the adhesive cannula dressing to secure the cannula in place.
Flush each of the extension set ports with 1mL saline solution, using a push-pause technique, and carefully observe for any swelling or leakage in the area. Ensure the patient is not experiencing any discomfort.
Clean the area, disposing of non-sharp waste in the appropriate waste bin.
Note that blood can be taken from the cannula using a syringe - this is not common practice, but may be seen in A+E.
Completion
Fill in the insertion date sticker and apply this at the edge of the cannula dressing.
Check the patient feels comfortable and ask them to inform a member of staff if the site becomes painful, red or swollen. Thank the patient.
Remove your gloves and wash your hands. Record the procedure in the patient’s notes, documenting the date, time, procedure performed, indication for cannulation, the cannula used, batch, size, site, flush, any complications and the required removal date (2 days after insertion).