Introduce yourself with your name and role, and confirm the patient’s name and date of birth. Explain the procedure, check the patient’s understanding and obtain consent. Wash your hands.
History
Ask the patient about the source of the wound and if they are currently in any pain. Enquire about the patient’s tetanus status; if they have not been fully vaccinated they will require a tetanus booster. Identify any allergies the patient may have, particularly to latex (if present, avoid) and whether they are on any medication, especially anti-platelets, as this can increase bleeding time.
It is very important to exhibit good communication skills, especially in a situation where a patient may be scared or anxious. Pay close attention to the patient’s facial expressions. You may wish to enquire specifically about needle phobia and reassure the patient that following the anaesthetic, the procedure will not be painful.
Equipment
Collect a procedure trolley, and clean the top surface using an alcohol surface disinfectant wipe. Next obtain a plastic tray, and clean it in a similar manner. You will then need to collect a number of items.
For cleaning
A pair of non-sterile gloves.
Five 10mL sachets of 0.9% sodium chloride (saline) solution.
Gauze.
For anaesthesia
A pair of sterile gloves.
Alcohol wipe (2% chlorhexidine in 70% alcohol).
20mL 1% lidocaine solution (with or without adrenaline.
Drawing up needle (≤18 gauge).
Subcutaneous needle (25-27 gauge) and syringe (20mL).
Ensure that all equipment is in date. Open the suture pack on top of the clean procedure trolley. Be sure to maintain sterility by only touching the outer part of the packaging. Using aseptic technique, empty the sterile gloves, suture material and sterile drape into the sterile field. Keep the rest of the equipment for cleaning and anaesthesia in the plastic tray.
Aseptic (or sterile) technique refers to the use of certain strategies to prevent transfer of microorganisms and maintain sterility. The basic steps involve washing hands thoroughly, working only with sterile equipment and creating barriers to pathogens using, for example, sterile gloves and drapes. It involves the creation of a sterile field and ensuring that the outer packaging of the various equipment or any other non-sterile equipment does not contaminate this sterile field.
Suture materials can generally be divided into two types: absorbable and non-absorbable.
Absorbable suture materials are used when placing deep sutures. These are broken down by body tissues and therefore do not need to be removed. Examples include Vicryl™ and Monocryl™.
Non-absorbable suture materials are used when the sutures need to be placed superficially. For example, they may be used to close skin, and will eventually need to be removed. Examples include nylon and Prolene™.
Absorbable and non-absorbable suture materials can be further divided into monofilament or multifilament (braided).
Monofilaments consist of a single strand. They cause minimal drag on the tissue as they have a smooth surface. However, they can be easily damaged during the suturing process and hence must be treated delicately.
Multifilament sutures create more secure knots and are stronger as they consist of several fibres twisted together. However, they are more difficult to handle and are harder to pass through tissue. They also have a slightly more increased risk of infection.
Wound preparation
Inspection
Assess the size and depth of the wound as well as the state of its border. Inspect for any pus inside which may suggest infection. Ensure that there are no foreign bodies present, such as glass. Finally, check the surrounding skin for any bruising or erythema which may suggest a cellulitis infection.
Cleaning
To clean the wound, take the gauze and soak it in saline solution. Carefully wipe the area starting from the centre of the wound and continuing outwards.
Anaesthesia
Before injecting the anaesthetic, confirm with the patient that they have had no previous reactions to local anaesthetic. Once this has been confirmed, clean the surrounding area using an alcohol wipe. Whilst waiting for the skin to dry, draw up the lidcaine solution into the syringe.
Once ready to inject, switch the needle on the syringe and don some sterile gloves. Using proper technique, inject 2mL of lidocaine solution subcutaneously into the surrounding skin. After doing so, manoeuvre the needle and continue to inject small amounts of anaesthetic such that all of the surrounding skin is anaesthetised. For medium to large wounds you will need to withdraw the needle and reinject at another area.
In an OSCE situation, you will usually be asked to treat the wound as though it has already been cleaned and anaesthetised.
Suturing
Wash and dry both your hands and the distal third of your forearms and then put the sterile gloves on using correct sterile technique. Allow the anaesthesia at least 5 minutes to work.
Positioning
Carefully position the part of the body with the wound and apply the sterile drape over it. At this point, explain to the patient that it is very important for them to keep still and not touch anything on the sterile field to avoid contamination.
Using the toothed forceps, pinch the sides of the wound to test for numbness, and ask the patient whether they can feel any pain. Be sure to warn the patient before you do this. The patient may be able to feel a sense of pressure but should not feel any pain.
Suturing procedure
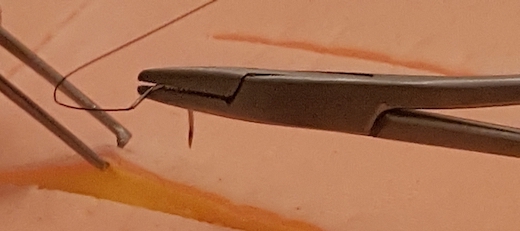
Use the forceps to position the needle in the needle holder so that the needle holder is two-thirds of the way up from the tip of the needle.
How to hold the needle.
There are many types of suturing techniques which can now be performed. The easiest of these, a simple interrupted suture, shall now be explained.
Non-toothed forceps are used to manipulate the needle whereas toothed forceps are used when handling tissue as they put less pressure on the skin, sparing delicate capillaries.
Simple interrupted suture: The simplest and most common suturing technique usually used to close skin, but is suitable for almost all wound types.
Vertical mattress suture: This suture causes the wound edge to evert and is mainly used for mobile skin or skin which is not well-supported, for example the skin on the shin. It is also used for wounds where the edges are likely to be inverted, such as on the back of the neck.
Horizontal mattress suture: Tension in this suture is spread better across the wound compared to that of the simple interrupted suture. This type of suture is very useful in closing areas of fragile skin such as between the fingers.
Continuous suture: A continuous suture brings the wound edges very close together, preventing any bodily fluids passing through and it is therefore effective in closing areas such as the peritoneum. It also saves time compared to inserting interrupted sutures.
Running subcuticular suture: This suture type also spreads the tension across the wound. It leaves minimal marks on the skin surface as the sutures are placed in the superficial dermis and hence give a good cosmetic outcome. It is commonly used in enhancing cosmetic procedures.
Performing the suture
Hold the needle holder in your dominant hand and the toothed forceps in the other. Starting from the middle of the wound, use the forceps to pull the skin up on the wound side closest to your dominant hand. Insert the needle into the skin on the same side at a 90° angle, at least 5mm from the wound edge.
Push the needle through the skin, supinating your forearm to follow the curvature of the needle as you do so. Remove the needle from the needle holder and pull the needle through that side of the wound using the forceps.
Position the needle back into the needle holder and insert it into the dermis of the other side of the wound, around 5mm below the skin surface. Again, supinate your wrist such that the needle emerges to the skin surface. Pull the needle through such that only 15cm of thread remains on the other side.
The needle holder should be held by placing your thumb and ring finger in the rings of the instrument. When using the forceps, they should be held as if you are holding a pen.
Tying the knot
To secure the suture in place, you will need to tie a surgical knot. This is achieved by tying three smaller “throw” knots.
1st throw: Hold the needle holder directly above and parallel to the wound. Wrap the longer end of the thread around the needle holder twice in a clockwise direction and then use the tip of the needle holder to grasp the shorter end of the thread and pull in opposite directions, tying the first throw.
2nd throw: Once again wrap the longer end of the thread around the needle holder, however this time, do so only once and in an anticlockwise direction. Then, as before, use the tip of the needle holder to grasp the shorter end of the thread. Pull the suture material through, tying another throw.
3rd throw: Tie this throw in a clockwise direction in a similar manner to the 1st. However, only wrap the thread once around the needle holder.
Once you have completed the three throws, you should have a strong surgical knot. Try to position the knot on one side of the wound. Next, cut both ends of the suture such that there is 5mm of thread on either side. This is so that it is easy to identify the suture. Insert more sutures as required about 5-10mm apart.
Once you are finished, dispose of the needle in the sharps bin.
Take special care to never touch the needle with your hands. You can use your hands when handling the thread but the needle should only be handled with the needle holder or forceps.
Final steps
Press lightly on the sides of the wound to stop any bleeding. Once satisfied, remove the drape and your gloves. Arrange for the wound to be dressed using a non-adherent dressing.
Aftercare
Inform the patient that it is important to keep the wound dry. To allow it to heal, tell the patient to avoid contact sports and swimming. If this is difficult, you can offer a waterproof dressing.
Removing the sutures
Inform the patient that they can get their sutures removed by a nurse at their local general practice or walk-in clinic in about 10 days. In the meantime, they should look out for any signs of infection including erythema, swelling, pus, pain or fever. If the patient notices any of these signs, they should go to their nearest walk-in clinic to get it checked.
In an OSCE situation, you will often be quite pressed for time. Therefore, it may be useful to explain the information regarding aftercare whilst you are carrying out the procedure, rather than afterwards.
The site of the suture is an important factor in influencing the duration until the sutures can be removed.
Stitches inserted on the head can be removed in about 5 days. This is due to the good blood supply to this region of the body.
Stitches over joints must be present for 10-14 days. This is because these areas are usually under a lot of stress due to the continuous movements which stretch the skin.
Stitches on other body parts can be removed in in 7-10 days.
Completion
Ask the patient if they have any final questions. Thank the patient and wash hands. Dispose of any unwanted equipment.
Document the procedure in the patient’s notes, recording the type of suture material used, site of the wound, date the suture was inserted, number of sutures and the expected date of removal of the sutures.
Interactive markscheme
When assessing each other, click on each list item as you go along. Doing so will turn the list item green. Make careful note of any steps missed at the end.
We recommend completing any examination or procedure in under 10 minutes, but you can adjust the timer to suit your needs.
:
Introduction: “Hello, I’m SimpleOSCE and I am a medical student. I need to close your wound(s) today. Can I confirm your name and DOB? Thank you.”
Explain procedure and obtain consent: "This will involve me using a medical needle and thread to bring the edges of your wound together. Your skin will be numbed, and you will feel no pain. Would that be okay?"
Wash your hands.
Ask about the patient's tetanus status.
Ask the patient if they have any allergies (latex) or if they are on any medication (anti-platelets).
Collect a sterile trolley and give it a quick wipe.
Open the suture pack onto the sterile trolley.
Open the suture material and sterile gloves onto the sterile field and dispose of any waste whilst maintaining sterility.
Would preparation (9-12)
Inspect the wound for foreign bodies, pus, bruising or erythema.
Clean the wound using 0.9% sodium chloride solution (or ask if it has been cleaned previously).
Anaesthetise around the wound edge subcutaneously (or ask if local anaesthetic has been given around the wound).
Ensure appropriate time has passed for the anaesthetic to take effect.
Suturing (13-27)
Wash hands up to the distal third of the forearms.
Wear sterile gloves using correct sterile technique.
Position the arm appropriately and apply skin drape over the wound.
Check that the wound has been anaesthetised using forceps.
Hold the needle holder appropriately and grasp the needle 2/3 away from its point.
Do not touch the needle with your hand at any point.
Pierce the skin at a 90° angle, 5mm from the wound edge.
Complete the suture with a 2-1-1 simple interrupted stitch.
Cut any remaining thread leaving 5mm on either side.
Repeat the previous three steps to complete any additional required sutures at least 5mm apart from each other.
Dispose of the needle appropriately in the sharps bin.
Arrange for the wound to be dressed.
Discuss after care: "Keep the wound dry" - if patient happens to be a swimmer, advise against swimming. "Your local GP/nurse can remove the suture in 10 days. Please go to the walk-in clinic if you notice any redness, swelling, pus or if you have pain."
Thank the patient and wash hands.
Document the type of suture used, wound site, date of suture, date of removal and number of sutures.